Happy Holidays
(Note: though this was originally written way, way back in the CE4 days, the css and html work just fine in Backlight)
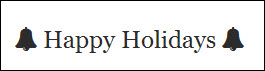
Like those little bells? That’s done by applying some custom css to the Font Awesome bell icons that I placed before and after “Happy Holidays”.
If you’re using the CE4 plugins, then the Font Awesome code to place the bell is <i class=”fa fa-bell”></i>. (If you’re using CE3, then use <i class =”icon-bell-alt”</i>)
Place one of those before “Happy Holidays” and one after and you’ll have Happy Holidays with bells on. If you’re doing this on your Pages Home page, just enter it in the Home Page Copy(md) field.
To make the text bigger I wrapped it all in H2 header tags. I also want to give a little space between the bells and the words so I include a space before and after “Happy Holidays”, like so:
<h2><i class=”fa fa-bell”></i> Happy Holidays <i class=”fa fa-bell”></i></h2>

This is what you’ll see in Lightroom:
But that makes for boring black bells (or whatever color you’ve selected for text in the plugin) on each side of the greeting. I want one red bell and one green bell. And I want the bells to swing back and forth. The red and green part is easy. You can do that with inline styling. And if you do this in Lightroom, you’ll see the colored bells:
<i class=”fa fa-bell” style=”color:red;”></i>
Or I can assign a custom class to each bell and style it from my custom css file. Since I need to add a class so I can target the bells with css animations, I might as well just add the color in the custom css too. So in Lightroom, in the Page Copy (md) block, I’ll assign a custom class to each bell:
<h2><i class=”fa fa-bell bellLeft“></i> Happy Holidays <i class=”fa fa-bell bellRight“></i></h2>

Again, in Lightroom all you’ll see are those static black bells.
Now we’re going to get into some custom css. See how to enable custom css in Backlight here. If you’re using CE4 you’ll need to enable phplugins and then enable custom css from within the phplugins.php file.
In my custom css file, if I simply wanted to color the bells I would add the classes to my custom css file and style them with color:
.bellLeft {
color: red;
}
.bellRight{
color: green:
}
And if that’s all you want, you could stop there.
But let’s make those bells swing. I won’t go into the explanations of what all this does. If you want to know about css animations (and all sorts of other things about css, I recommend CSS3: The Missing Manual by David Sawyer McFarland). I will tell you that I set the rotation and animation time different for each bell. This is so they don’t just swing back and forth together. That would be boring. So now they each swing at a different rate and one swings farther than the other. Much more exciting, don’t you think? You can adjust those setting to your own liking.
Below is the code you need. The animations should work in all modern browsers. If you want to make sure it works in older browsers you can add the extra vendor prefixes on your own. Frankly, this is just for fun anyway so I’m not really concerned if the bells swing in older browsers.
/*Bell ring animations*/
@-webkit-keyframes bellringleft {
from {
-webkit-transform: rotate(20deg);
}
to    {
-webkit-transform: rotate(-20deg);
}
}

@keyframes bellringleft {
from {
transform: rotate(20deg);
}
to    {
transform: rotate(-20deg);
}
}

@-webkit-keyframes bellringright {
from {
-webkit-transform: rotate(-30deg);
}
to    {
-webkit-transform: rotate(30deg);
}
}

@keyframes bellringright {
from {
transform: rotate(-30deg);
}
to    {
transform: rotate(30deg);
}
}

.bellLeft {
color: red;
display:inline-block;
-webkit-animation: bellringleft 2.5s linear infinite alternate;
animation: bellringleft 2.5s linear infinite alternate;
}

.bellRight {
color: green;
display: inline-block;
-webkit-animation: bellringright 2s linear infinite alternate;
animation: bellringright 2s linear infinite alternate;
}
When the holiday season has passed you can simply remove the bell icons and change your text. In the custom css file you can either leave things as they are or you can comment out the code. If you leave the bell ring css as is, then next year all you’ll have to do is add in the Happy Holidays text along with the bell icons and custom classes. I just keep text files handy of all these kinds of code snippets so I can just copy and paste as needed instead of having to type it all over again.
To comment out the code, remove the trailing */ from after /*Bell ring animations*/ and place it behind the last closing curly brace at the end of the code.
What I do is simply comment out the html “Happy Holidays” code for most of the year, and un-comment it during the holidays. Here’s what it looks like with html comments:
<!-- <h2 style="text-align:center;"><i class="fa fa-bell bellLeft"></i> Happy Holidays <i class="fa fa-bell bellRight"></i></h2> -->See, wasn’t that easier than having to go outside and put up the lights?
And if you want to make it snow on your site, see Matt’s tutorial here.


1 thought on “Add some holiday cheer to your site with custom css”