Note: this post was originally written during the TTG CE2 era. We’re now in CE3 CE4. But everything here still applies and I’ve updated some references below.
The Turning Gate (TTG) makes a fantastic set of tools that enable you to create beautiful websites and galleries right from within Lightroom. The big advantage of course, is that you can manage nearly every aspect of your site from Lightroom. You no longer have to create images sized for the web, you no longer have to create pages or webs using other software such as Dreamweaver or Expression Web (formally FrontPage). You can do it all right inside of Lightroom.
And though the plug ins are pretty easy to use and implementation is actually quite simple, it can take a little bit to get your head wrapped around the concepts of how all these plug-ins work together.
So I’m going to try to clear it up.
But first, let’s take a trip back into the distant past……
….back to the days of 35mm slides.
Back then, if you were shooting lots and lots of slides, you had to have a way of finding them quickly, with or without a computer.
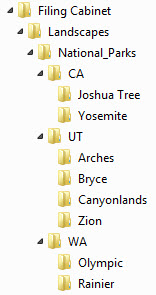
I store my slides in filing folders inside a filing cabinet drawer inside a filing cabinet. One drawer has all “landscape” or “location” kinds of images. Another drawer has images of “things” like flowers, trees, mushrooms. You know, “things”.
Inside the “Landscapes” drawer I have filing folders divided into sections of the drawer. One section is National Parks and inside that section are file folders for national parks organized by state and then park (and if I have lots of pictures of a particular park, I break it down further).
…ok, back to the present day.
So, translating that into computer organizing, I might have a folder structure something like this:
Now of course, I don’t organize my digital images this way. That would be tedious and unnecessary. I let the computer do all the work of finding and organizing using the metadata I’ve added to the images. And besides, in Lightroom, I can set up a structure just like the one I show to the left very easily using virtual folders called Collections. And that’s exactly what I do to organize the images that I want to show in my web galleries. It’s also the way I organize my gallery folders on my web server. But more on that later.
The idea behind the TTG Lightroom web engines was to enable the photographer to easily create professional looking websites and galleries over which the photographer would have complete control. The gallery concept is ingenious. It’s set up so that all you have to do is create and export a TTG gallery from Lightroom, upload it to the proper folder on your web server, and the link to it automagically appears on your gallery index page. No going in and adding links or manually changing pages, no creating thumbnails to display on an index page. None of that.
All you have to do is to put things in the right place.
There are some requirements. You need your own website. This means you need to buy hosting from hosting providers like Blue Host or GoDaddy or the like. Things get complicated, if not impossible, if you’re using a free hosting site where you don’t have control of where things go or whether they put any content you upload into some sub-folder or another.
Your web host also needs to be running PHP 5.2.6 or newer. Read more about hosting here.
First, let’s assume you want an entire website. For that you start with TTG CE3CE4 Pages. (CE stands for Core Elements). This plug-in creates the framework for your website. It creates a Home page, a Galleries index page, Info, Services, About, and Contact pages. It’s highly customizable and there is plenty of information on that at the TTG site so I’m not going to go into that in this article.
Secondly, you need a gallery. The main image gallery plug-in is CE3 CE4 gallery. There is also the Client Response Gallery and Stage. You can find out more about those here.
So at the minimum, to create a web site, you’ll need TTG CE3CE4 Pages plug-in and TTG CE3CE4 Gallery plug-in.
Follow the instructions in the web engine and consult the Wiki for more information. Once you’ve designed things the way you want, it’s time to put it all on your web server. This is where most people start getting lost. So here’s what you need to do, step by step.
Export your TTG Pages creation to your desktop or somewhere on your hard drive where you can easily find it. Maybe make a folder on your drive called Web Site/ and store all your exports there. When you export your Pages, you’ll be asked to name it. “Pages” is as good a name as any.
The export will create a folder called Pages. Inside this folder will be other folders and files.
Now, using an FTP program, upload the contents of this folder (those other folders and files, not the “Pages” folder itself) to the root of your website. This is often the public_html folder, but that will depend on your hosting provider. These are the folders you should see in the root of your site:
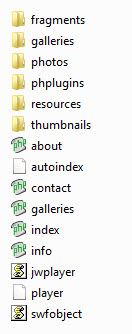
See that galleries folder? In just a little bit, that’s going to be the really important one.
You should use an FTP client rather than Lightroom’s Upload service to do this. More on FTP here.
So now let’s create a gallery. My suggestion is to organize your galleries using Collections. There’s more on that here and here.
Design your gallery to your liking. Don’t forget to fill in the Album Info at the top of the Color Palette control pane. This will be important later. Click the Export button, choose a location, and name your gallery. Naming convention is important. Don’t include any spaces in your name, use hyphens or underscores instead of spaces. Read this and follow it, at least the part about characters allowed in file names. Your life will be much easier for it.
OK, now you’ve got an exported gallery. Let’s upload it to your site. Remember that galleries folder? That’s where you want to upload your gallery. Upload the entire folder that was created from the export into the galleries folder on your server.
Believe it or not, that’s all there is to it. Go to your home page, click on the Galleries link in the menu and you should see a thumbnail representing your gallery along with your gallery’s title and description that you filled out earlier in the Info for Auto Indexing section. Click on that thumbnail and behold your gallerific creation.
Now, if you want more levels of gallery organization, like the folder structure I show above, you’ll need one more TTG engine: TTG CE3CE4 Autoindex.
It works pretty much like the other plug ins. Design, fill in the Auto Indexing information in Output Settings, export (watch the naming!) and upload. But where does this one go?
Let’s say you want to be able to go to your gallery index and instead of seeing gallery links, you want a link that leads to your Landscape galleries and a link that leads to your Portrait galleries. You want to be able to click on these links and go to a page where you see your different galleries. The Landscapes link will lead to a page that displays links to your landscape galleries. I bet you can figure out where the Portraits link will lead.
To accomplish this, take that Auto Index folder you just exported, and upload that to the galleries folder. Let’s say you created a Landscapes index and cleverly named the folder landscapes. Put that folder in the galleries folder. Now put all your landscape galleries inside the landscapes folder (which is inside the galleries folder).
Using this technique, you can nest gallery indexes and galleries down as many levels as you like. Be sure to read about keeping your menu navigation links straight once you start nesting indexes and galleries.
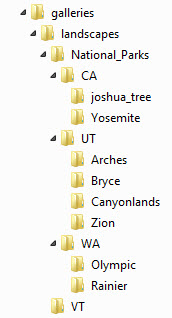 If you look at my galleries you’ll see I have a Landscapes link. Click on that and it takes you to another gallery index that has links to a National Parks index as well as links to Washington and Oregon indexes and a link to a Vermont gallery.
So let’s take that slide drawer/folder illustration from above and translate it into TTG indexes and galleries.
In this example, all the folders with little arrows next to them represent indexes. The plain folders are galleries. The Vermont gallery is on the same level as the National Parks index. So when you go to the Landscapes index, you see a link to the National Parks index and a link to the Vermont gallery.
Not so tough. Just think of your web gallery folder structure as a physical filing system and you should be able to easily keep all this straight.
ADDED NOTE: Matt from TTG has written an excellent post on using TTG Auto Index. It’s a great read and should answer any questions you might have about using the Auto Index.

