Scenario: You’ve got a TTG CE4 (or earlier) site with many galleries. However, these are exported and uploaded galleries, not Publisher albums.
Goal: To update your TTG CE4 site to Backlight while keeping your existing TTG galleries available to visitors and clients, perhaps eventually converting old galleries to Backlight controlled albums.
Problem: There is no way to easily and quickly convert uploaded galleries to Backlight albums. If you’re using Publisher on your existing site, you’re in business, there’s a migration tool included in Backlight.
To keep your old galleries accessible while publishing new albums, you’ll need to run a parallel set of galleries: one will be your legacy TTG galleries and the other will be your new Backlight-based albums.
I can’t cover every scenario so I’m just going to cover a basic TTG Pages installation. In this situation, all of your galleries are under the galleries/ folder and are accessed via the link to the Galleries page (galleries.php) in your navigation menu. The simplest thing to do is to leave the old galleries as they are for the time being.
If you do this, then when you install Backlight don’t use the galleries/ folder as the top-level directory. If you do, your old galleries will not be visible in the new Backlight Galleries page. Come up with another name for your top-level galleries folder, like “portfolio.” It doesn’t really matter, just make sure the name contains no spaces, punctuation, or special characters. Use this name for the “Top-level galleries directory” when you set up Publisher in Lightroom.
If you ever republish your legacy galleries as Backlight albums, then once you’ve completed that project you could delete the existing galleries/ folder and rename your Backlight top-level directory to “galleries” if you wish. I’ll outline the instructions for that at the end of this post.
If you want to start using Backlight with your top-level galleries directory named “galleries,” then it gets a little bit more complicated. You’ll need to rename your existing galleries folder to something like “legacy-galleries” and then you’ll have to edit the galleries.php file from Pages to use that folder in autoindexing instead of “galleries.” That’s detailed at the end of this post as well.
So decide how you want to handle your old galleries and your new Backlight albums.
Prep work
Design your new Backlight page templates in a testing sub-folder or sub-domain. Get your pages, album sets, and albums just the way you like them. This will require that you publish a few albums and album sets to your test site. Just delete them from Publisher when you’re ready to go live.
(Note: you can create as many albums in your test site as you wish and then move them to the main site, but it might be quicker to just publish them once in the new site)
Create similar pages to those you have on your existing TTG based site. Pages like Info, About, Contact, Services, etc.
When you’re ready to change your main site over to Backlight, you’ll need to delete some of your existing files first. Eventually you’ll be able to delete them all.
For now (assuming a CE4 installation), delete the index.php, mobile.php and the .htaccess file, if you have one. If there is code in your .htaccess file that you feel you still need, then download the file to your computer so you can get to it later.
Also delete info.php, about.php, contact.php, services.php if you have any of those.
DO NOT delete your existing galleries folder. Also keep the lib/ folder (resources/ for CE3 and earlier), and lib.php (CE4). Your CE4 Galleries page will need these files, as will your galleries and autoindexes if you were using the Share Resources with TTG Pages feature.
If you were using phplugins for navigation or custom css, then don’t delete your phplugins folder. If your existing site is using phplugins for navigation, you may need to edit the phplugins.php file to reflect the navigation in your new Backlight site.
NOTE: if you simply want to re-create your entire site in the test folder, that will work too. When you’re ready to make the move you’ll need to empty out all your old ttg files, autoindex folders, and gallery folders and then move your new site to its new home. See below.
Important note:
There’s a very good chance that the navigation in your legacy galleries and autoindexes won’t work as expected. And if you’re not using phplugins to manage your CE4 navigation, then it’s not easily changed (you’d have to change the navigation then export and upload your galleries and autoindexes again).
For example, clicking on “About” from one of your legacy galleries might give a 404 page not found error when trying to access your new Backlight About page. A way to possibly avoid this is in your Backlight Settings. Under Website Settings, set Page URL Format to “page.php” and name your extra pages (like About, Service, Contact, etc.) the same as you did for your CE4 site.

If you’ve made a sitemap.xml file for your site, you’ll need to regenerate it after updating to Backlight.
Because Backlight can upload image files for use as favicons and apple-touch icons, you can safely delete any of those if you wish and manage them through the Backlight interface.
Move Backlight files to your main site
Now you’re ready to copy the Backlight files to your main site. But first, a suggestion. In the years I’ve been using TTG products, I’ve found it invaluable to have a test site where I can try out ideas without risking my main site. So my suggestion is to leave intact for future playing/testing, the site you’ve been developing in a sub-domain or test folder. If you don’t want to keep a test site, you can skip the first two steps and instead use your FTP program to move the files.
So on to the move.
- In your FTP program, download to your computer the backlight/ folder and the index.php and .htaccess files. If you’ve renamed the galleries folder containing your current exported and uploaded legacy galleries then also download the galleries/ folder from your Backlight test site folder.
- Now upload those same files to the root of your main site.
- Once all files have been uploaded, go to yoursite.com/backlight and log-in with the credentials you created previously for your test/development site.
- Change the Site and Company URLs to your site’s address.
Any images for your test site that you uploaded using the Backlight image uploader should come along for the ride. But sometimes the don’t. If they didn’t make it, just upload them again via the uploader.
- If you’re keeping your old galleries for now, edit your Backlight Menu Set, adding a menu item for your legacy TTG galleries. Choose URL in the “Link to” field and enter the url to the Galleries page of your old TTG site. The link should go to the galleries.php file in the root of your site. You may wish to change the name of the link to Legacy Galleries or something similar.

- In your FTP client program, create a new folder in the root of your site for your Backlight albums. Name it whatever you wish within the guidelines mentioned above. This assumes you’ve left your legacy galleries/ folder as it is and haven’t renamed it.
- In Lightroom, go to the Publisher instance for your Backlight test site and change the API URL to reflect the new location. For example: http://yoursite.com/backlight/publisher/
- Rename the Top-Level Galleries directory in Publisher to the name of the folder you just created. Again, this is assuming you’ve left your legacy galleries/ folder as is.
- Check Authentication to make sure everything is communicating.
- Now Publish an album. Backlight will automatically create an Album Set page in your top-level gallery folder. This is your your main Backlight galleries page. To make sure that this new page will match the rest of the site, assign an album set template to this Top-level Gallery.
- Go to your Backlight dashboard > Publisher > Top-Level galleries. Click on the name of the top-level gallery, then click on Assign Templates.
- In Backlight Dashboard go to your Menu Set and add a link to the new top-level gallery page. Name it Galleries (unless of course you used “Galleries” to name the link to your old galleries) and in the “Link to” drop down, choose Album Set and then in the next drop-down, choose the name of the folder you just created. Set the descendant levels to your preference.
You should now be set to continue publishing albums and album sets.
Old galleries to shiny new Backlight albums
If you plan on converting your old galleries to Backlight albums, you can now start that painstaking process.
Hopefully you have all your existing galleries in Lightroom as web collections, this will make the process move rather quickly. If you don’t…well, good luck with that. You’ll need to reconstruct your existing galleries as Collections in Lightroom.
Go to each gallery collection and highlight all the images.
Go to Publisher and create a new album. Make sure that “Include selected images” is checked. Choose the album template you made in Backlight.

If you have text in any of your existing autoindex and gallery pages you can copy it over to the new albums and sets using one of two methods:
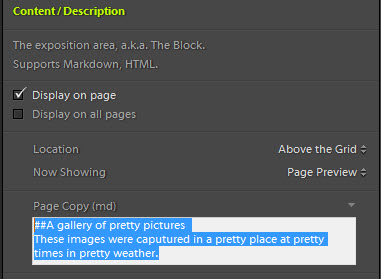
If you have the galleries saved in Lightroom, you can open them and copy from the Page Copy (md) fields and paste into the Page Copy (md) fields in Publisher’s Album and Album Set create/edit dialog boxes.
Or you can copy directly from the existing web pages. If you just have plain text without headings or text links, you can highlight and copy from the page. If you have headings or links, then view the page’s html source (right-click on the page and choose View Page Source and look for the appropriate html) and copy/paste that code into the Page Copy (md) field in Publisher.


One strategy I’ve used is to create a plain text file ahead of time and copy all of the text/code that I need from Lightroom into that file. Then when creating the new albums, I just select the images in Lightroom, create the new album and go to the text file to grab the appropriate text.
To change the name of your top-level Galleries directory
Use this method if, after converting your old galleries residing in the galleries/ folder to Backlight albums, you want to change the name of the Backlight top-level galleries folder.
- Manually change the directory name via FTP
- In Backlight, go to Publisher > Top-level Galleries and click on the title of the top level gallery directory you’re changing.
- In the Directory field, change the name.
- In Lightroom, change the Top-level galleries directory in the Publisher instance.
Preserving the autoindexing function of your legacy Galleries page
Use this if you’ve decided to rename your old galleries/ folder (the folder containing your legacy TTG exported and uploaded galleries).
Using a plain text editor like Notepad++ for Windows or TextWrangler for Mac, open the existing galleries.php file. Around line 522 in galleries.php you’ll see:
<!--  Loop **************************************** -->

<?php
define('BASE_DIR', './galleries/');

if (!defined('BASE_DIR'))
define('BASE_DIR', '');

include_once './lib/autoindex/autoindex-view.php';
?>

<!-- /Loop **************************************** -->
Change this line:
define('BASE_DIR', './galleries/');
substituting “galleries” with the new name of your legacy galleries folder.
All this will take some work, but just be patient and take your time. Eventually you’ll get all of your old galleries and autoindexes converted to Backlight. Life will be good, puppies will never get old, and your supply of chocolate chip cookies will never run out.


Whew! I hope I live long enough to build a new site. Can I skip a lot of this if I do not try to re-create the same galleries?
Yes! Just start from scratch. If you have your galleries as Lightroom Collections, it will be pretty easy to quickly publish them as albums.
I’s suggest copying any page and gallery text into a text editor first, that way you can just paste it all back in to Backlight albums and pages when ready.