Many people want to customize their sites beyond the myriad settings available in the TTG plug-ins. And even though Matt has included a ton of options (which can be overwhelming at first), there is no practical way that he can include every option someone might think of. Therefore: custom css.
Enabling custom css is done through phplugins, and that’s documented here (CE3) and here (CE4). It’s pretty easy to do.
But what do you do with it? That’s the question.
First, you’re going to have to get your hands a little dirty with learning some css. You don’t need to know a lot to put custom css to work. You just need to know some basics about creating css rules: Selectors, properties, and the values of those properties. There are about a bazillion resources on the web and almost as many books on the subject, so for now I’m going to leave that mostly up to you.
Except for just a couple of quick examples:
p {

font-size: 18px;

color: red;

}
Above, p is the paragraph selector. Font-size and color are properties. 18px and red are values. (Here I’m using a keyword for the color. You can learn more about colors and css here)
This rule says to give all text in paragraph tags a font size of 18px and a color of red. Pretty simple stuff.
A css rule starts with a selector. Inside the curly braces are the declarations consisting of properties and values. Properties are separated by values with a colon. And a semi-colon follows the value of the property. Some properties will list several values. The semi-colon comes after the final property. It indicates the end of the line of code.
.album-title {

font-size: 18px;

color: red;

}
In this example, .album-title is a class (classes start with a period). A class can be applied to just about any html element. In this case, items inside the .album-title class are being assigned the font size of 18px and the color red. These properties will only be assigned to elements in the class that can accept these properties. Like p tags or headings.
.album-title p {

font-size: 18px;

color: red;

}
And in this code above, .album-title p means that the declarations contained within the curly braces will apply only to p tags found inside elements with the .album-title class. If there are other element tags, like headings (h1, h2, h3), these won’t be affected.
p.album-title  {

font-size: 18px;

color: red;

}
A variation of the previous example. In this case p.album-title means that the settings are applied to paragraphs that have a class of .album-title as opposed to paragraphs that are inside of elements with that class.
Ok, enough basic css. When you want to customize your site, the question comes down to this: what am I customizing? Let’s keep using the above example.
On the TTG Pages Galleries page and in the TTG Autoindex, you can display titles and descriptions on albums contained in the page. The base styling (font, font-size, and color) is controlled in the master typography section in the Site Info control pane under Base Font Size. This sets the styling for regular text throughout the site, including the Titles and Descriptions shown on index pages. Note that on the web page, Album Titles are displayed in bold and descriptions are shown at a slightly smaller font size. This is all hard-baked into the code.
But what if you want to change any of that. What if you want a different font for your titles or if you want them all displayed in uppercase? What if you’re design calls for them to be a different color?
Writing the declarations for these settings is fairly easy, but to what selector are they applied?
This is where one of the most useful built-in browser tools comes in handy. In most modern browsers you can right-click on a page element and select “Inspect Element”. This feature is built in to the latest versions of Firefox, IE, Chrome, and Opera. With it you can add or remove styling and see the changes immediately. I use this all the time in testing my site and trouble shooting the sites of others. Don’t worry, you’re not changing the site for other viewers, just for you. If right-click has been disabled on the site you’re inspecting, use the browser’s menu. Look for Tools and underneath that look for something like Developer or Developer Tools.
So let’s figure out how to add custom styling to that Album Title. I’m using Firefox in this example, but the other browsers are similar.
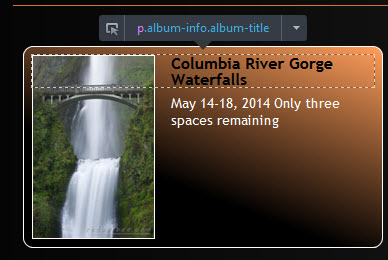
Right-click on the title of any album in your index and choose Inspect Element. Here I’m right-clicking on the title “Columbia River Gorge Waterfalls.”

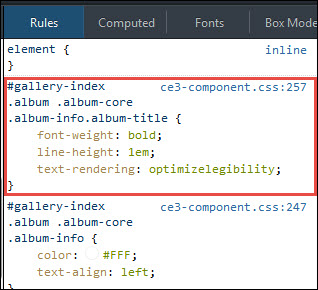
At the bottom of the page you’ll see a whole lot of stuff in the Inspector, including the selected element highlighted in the code. Note the class names. Here they’re “album-info” and “album-title.”. (In Firefox you’ll also see the element outlined on the page itself with its selector shown.)

In the right-hand panel you’ll see the css that’s affecting the element.
If you click beneath the last declaration you’ll be able to enter text. This is where you can start experimenting with styles.
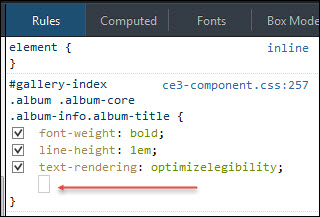
Now change the color. You can also keep going and add other declarations beneath this. Like Font-size, Font-family, etc. Here I’m just typing color: black. The semi-colon is automatically added.

And you’ll immediately see the changes on the page. In this case, I’ve just changed the Title Color from white to black.
Once you see that you’re changes will do what you want them to do, it’s time to actually add the rules to your custom css file and see if will work. This is sometimes a trial and error process. The reason that it might not work right away is because of what’s called “specificity.” In css, the more specific the selector is the higher priority it has. So if there’s a more specific css rule written for the Album Title, then it will take priority.
For this example I’d initially try this:
.album-title {

color: black;

}
That will likely work because album-title is only used in one area of the page, the album index.
But if it doesn’t, what you’ll need to do is look at what comes before the selector you’ve chosen and perhaps add that to the selector. For instance, in this case we may need to make the selector be p.album-title (any paragraph element with the class .album-title) . Or we may even need to go as far as:
.album-mantle .album-core p.album-title (paragraphs with the class .album-title that are also inside the class .album-core inside of the class .album-mantle), though I doubt doing this will be needed for this case.
Another thing this tool allows you to do is to add to the css files themselves. So if you already have a custom.css file set up, you can access it and add your new rule. This is the quickest way to see if adding a rule to your custom.css file will work or not. The way to access your custom.css file (or any of the other css files) is to click on “Style Editor” in the console and then use the scroll bar on the left to find your custom.css file. Click on it and you’ll see, and be able to edit, your custom css. (Again, this is in Firefox) What you do here isn’t permanent, it’s for development purposes. You’ll still need to add the code to your custom css file and upload it to your site.

An !important note
Though it’s often not the best practice because it may cause problems elsewhere, one way to override a more specific selector is to use the !important declaration.
In this case, that rule would look like this:
.album-title {

color: black !important;

}
Using the Inspector takes some practice, but if you want to be able to customize your site on your own, then take the time to learn how to use it. And while you’re at it, check out some of the many books or short tutorials on CSS. There are many e-books you can find for only a few dollars that will get you up and running with css basics. And if you want to dive in further, I can recommend CSS3: The Missing Manual by David Sawyer McFarland (O’Reilly Books)

