In general, a landing page is a stand alone page designed for a single purpose. It stands apart from your main site and has no navigation, header, or footer to distract from its objective. And what is that objective? It could simply be to get people to sign up for your newsletter. It could be a special offer to get a new client to book a sitting. It could be page promoting a fine art print special you’re running. It’s like a flyer you might hand out or leave on a table at an event you were speaking at.
Creating the blank page is easy with TTG web plug-ins (any version). You can do this using Stage, Autoindex, or Gallery.
Simply go through all the settings in Site Info and uncheck Display on page for:
- Header
- Navigation
- Grid
- Footer
- Social Media Profiles
- Social Media Sharing
Then go to Color Palette and make sure any borders are set to 0px. In the Page Image area, unless you want to use an image in the block, set Location to Disabled.
If you’re using Autoindex or Gallery, go to Appearance > Gallery/Media area, uncheck Display on Page. If using Stage, this is optional.
You should now have a completely blank page except for whatever you’ve placed in the Copy (md) fields in Color Palette.
If you’re using Stage for your landing page, you could alternatively display the grid area (either above or below the block) and use it to display an image. Be sure to remove any borders you don’t want. If using Gallery or Autoindex, you can use the block image, floating it left, right, centered, or none. Centered or none will place the image above the text.
You may also need to add some margin and/or padding in the Block and Grid (if using Stage’s Grid area).
You might be asking “Why not just create a blank html document for this?” And you could. But by using the TTG plug-ins you can include a page title and description as well as keywords and other metadata found in the head area of the document. Plus you don’t have to bother with the document declaration or page structure. And you can still manage the page from Lightroom.
You now have a couple of options for adding content to the Block area of the page: directly placing it in the Page Copy (md) field or replacing the block with your own content using phplugins.
You could also use a combination of the two. Place your own html markup and content in the Page Copy field and use phplugins in case your content requires anything special like scripts that need to be added in certain places, or if you need to include page styling in the head tag.
Your landing page could be as simple as some text and images with a link directing your potential customer to where you want them to go. Remember, you’ve also got the built in sidebar to use as well as the main copy area. This sidebar is a great place to add a call out or even to drop in some code to get people to sign up for your newsletter. Most email marketing services like Constant Contact or MailChimp have html code you can drop in that will create a sign up form.
Some simple html code and some css can create a nice looking button for clients to click on too. Or you could go to one of the many button creation sites and grab some button styling code there.
If you want to structure your page with columns and rows, use the TTG Responsive Grid Framework. You can place images, text, or images with text, depending on how comfortable you are with html and css.
As a demonstration, I’ve used CE4 Stage to create a couple of landing pages. The first one is made strictly by using the controls in Lightroom for fonts and for styling text and hyperlink colors.
I’ve configured Stage to place the grid above the block and it’s set to display a still image 960px wide.
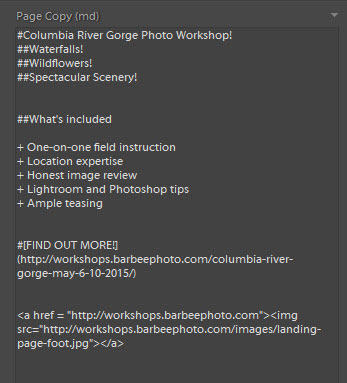
You can see the finished page here. Not that exciting, I admit.
In the text block I’ve limited myself to using Markdown syntax except for the image logo you’ll see at the bottom of the page. That’s added using some basic html.
The code for adding a hyperlinked image is:
<a href = "http://your-site.com"><img src="http://your-site.com/images/your-image.jpg"></a>
Just use your own urls to both the page you’re linking to and the image location.
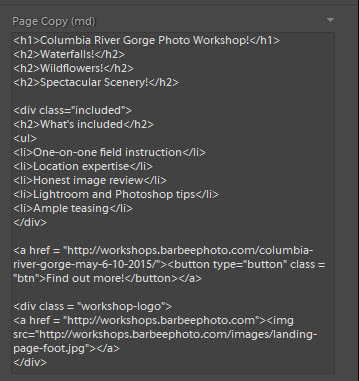
For the second example, I used the same text but wrote it all out in html. I included some classes (“included” and “workshop-logo”) and have added css via phplugins so that I could style the page. This page is a bit more interesting.
The main differences you’ll see are that everything is centered, there’s a drop shadow on the main image, the “What’s included” list has a border around it and the list bullets have been removed, and the “Find Out More” link is now a button.
I got the styling for the button by searching on “button generator” and choosing the first link that came up in the search: CSS Button Generator.
I included the button css as well as some other css via phplugins. To do this, enable phplugins in Site Info, leaving the server path field blank.
After exporting the page, go to where you exported it on your hard drive and change the name of the phplugins-sample folder to just phplugins.
Inside the phplugins folder, open the phplugins.php text file using a text editor. Scroll down until you get to the CUSTOM STYLESHEET area. Delete the lines indicated.
The default code included in the file that adds a custom stylesheet looks like this:
function ttg_head_end( $style, $path ) {

echo '

<link rel="stylesheet" href="/phplugins/css/custom.css" />

';

}
But I don’t want to use the custom.css file. The reason is that these landing pages are separate from my main site and therefore don’t need any of the custom styling that I’ve set up for the site. In fact, any custom css I have may cause unintended results on my landing pages. So I deleted this line:
<link rel="stylesheet" href="/phplugins/css/custom.css" />
And instead added style tags so that now the code looks like this:
function ttg_head_end( $style, $path ) {

echo '

<style>

...add css here...

</style>

';

}
In between those style tags is where I added any needed css. Note that you won’t be able to see your custom styling in the Lightroom preview. You’ll need to put your page online or view it in a virtual server like WAMP (Windows), MAMP (Mac), or XAMPP (either) to preview your page. If you’re curious about the css, you can just right-click on that page and choose “View Page Source.” The css comes right before the closing head tag (</head>).
Be sure to save your settings in Lightroom’s Template Browser so that the next time you need a landing page you’ll just need to put an image in a collection (if you plan on using an image) and select the template from the Template Browser. Then customize your text, Export, and upload.
If you’re styling the page (like in my second example) and you want a consistent look for your landing pages, then you can just use the same phplugins.php file. I suggest saving the phplugins folder with your customized phplugins.php file somewhere in your computer’s documents so it’s easy to find. Then, every time you export and upload a new landing page, just upload your phplugins folder directly into the exported landing page folder.
How you direct potential customers to your landing pages is up to you. I suck at marketing so don’t ask me!

