The thing about fonts on the web is that if your website is using a special font and you didn’t embed that font in your site, then your visitor may or may not see your font. It depends on if the font is already installed on their computer. The way to make sure that they see the font you want them to see is by including the font itself in your website.
Backlight comes with an easy way to add Google Fonts.
But what if you have purchased some fonts elsewhere and wish to use them. Or you have a font on your home system that you wish to use (and have the rights to use)?
First, let’s tackle the purchased font options. If you already have the font on your system, jump here.
When you buy fonts from a site like MyFonts, their instructions tell you how to install the fonts on your system and how to use them. Usually it’s a matter of uploading a folder and a css file. The instructions might tell you to put both the folder and the file in the root of your site. For Backlight, don’t do that, it won’t work. (this is due to the nature of how Backlight handles files in the root.)
Instead, create a new folder to store the assets. You can put it in the root of your site but a preferred place would be inside the /backlight/custom/ folder. It’s always a good idea to place any custom assets there.
The reason I suggest placing them in your custom folder is that it’s one of the two folders in Backlight that you should absolutely be backing up. (See the TTG documentation on backing up.)
So let’s say you’ve created a folder named “fonts” in /backlight/custom/ folder. Upload your assets to this folder. For MyFonts, it’s a folder named “webfonts” along with a css file named MyFontsWebfontsKit.css.
Now you need to make the fonts available to your site. You do that by inserting a reference into the <head> tag of all the pages in your site that points to the css file that calls the fonts . Use phplugins to do this. Make sure all your page templates (if you have more than one) are using the same phplugins file.
Note: For phplugins, be sure you start with the phplugins-pangolin-sample.php file from Backlight 2 or newer. For up to date installations of Backlight 3 or 4, download this file via FTP from your site at /backlight/modules/custom-resources/phplugins/. For Backlight installations prior to version 3.2.0, you can also get this file from your unzipped download of the Backlight-3-installer-114.zip (or earlier) folder: Backlight-3-installer-xxx/backlight/custom/phplugins/. You can also get it from any of the unzipped Backlight-2-Installer-xxx folders.
Here’s the function. It assumes that the font package is in the /backlight/custom/fonts/ folder and uses MyFonts as an example.
function head() {
echo '
<link rel="stylesheet" type="text/css" href="/backlight/custom/fonts/MyFontsWebfontsKit.css">
';
}
This also assumes that you’ve installed Backlight in the root of your site (or subdomain) and not a sub-folder. If it’s in a sub-folder, you’ll need to add that folder name in the path to the css file. For example:
/sub-folder-name/backlight/custom/fonts/MyFontsWebfontsKit.css
The MyFontsWebfontsKit.css file will also need some editing. In it, you’ll see and @font-face rule that lists the source location of the fonts themselves. It will look like this:
@font-face {
  font-family: 'Gilroy-Light';
  src: url('webFonts/Gilroy-Light/font.woff2') format('woff2'), url('webFonts/Gilroy-Light/font.woff') format('woff');
}
You need to modify the url so that it points to the font files. For example:
@font-face {
  font-family: 'Gilroy-Light';
  src: url('/backlight/custom/fonts/webFonts/Gilroy-Light/font.woff2') format('woff2'), url('/backlight/custom/fonts/webFonts/Gilroy-Light/font.woff') format('woff');
}
That should take care of installing the fonts.
Using your font
There are a number of ways to use your font. The easiest is to use the font site-wide.
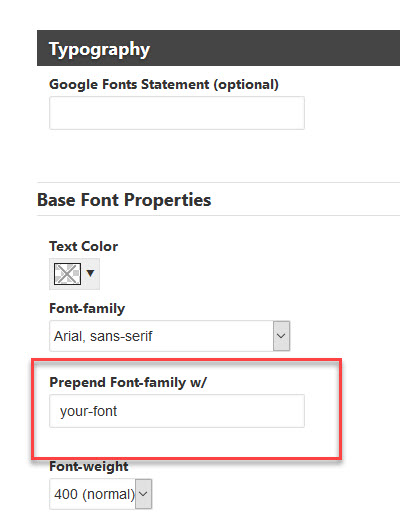 In the Typography section of your page template under Base Font Properties, enter the name of your font in the Prepend Font-family w/ field. This will make it so all the standard text on your site uses the new font. In the Font-Family drop-down you should also be choosing a font-family that has similar properties as the font you’re using. These will serve as backups just in case.
If you want other text elements to use the font, scroll on down to the Heading Font Properties section and do the same thing.
Or, if you have another font to use for the headings, enter that instead (assuming that you’ve installed it).
If you want to use the font as an emphasis, just a few words a time for instance, then write your text in html and include the font with inline styling:
<p>This is regular text, using the site’s default font. <span style="font-family: your-font;">This is the text that uses your cool new font.</span> And now we’re back to the site’s default font.</p>
You can use that technique anywhere in your page copy. But if you plan on using that font in the same fashion multiple times, then the easiest way to do it is using custom css.
<p>This is regular text, using the site’s default font. <span class= "special-font">This is the text that uses your cool new font.</span> And now we’re back to the site’s default font.</p>
In custom css you’d need to add this:
.special-font {
	font-family: your-font;
}
If you always want it in a different color, or italicized, you can add those properties to the class:
.special-font {
	font-family: your-font;
               color: #FFA500;
               font-style: italic;
}
CSS colors: https://www.w3schools.com/cssref/css_colors.asp
You already have a font you want to add
This is for when you already have the font files and you want to use the font on your site.
First, upload all the font-files to the /backlight/custom/fonts/ folder you created.
Generally, you’ll need the font in the following file formats, depending on the browsers you want to support:
.ttf, .woff, .eto, .svg
You then need to use the @font-face rule in your custom css.
Something like this, you may need more or less. See this article for more: https://css-tricks.com/snippets/css/using-font-face/
@font-face {

font-family: 'YourFont';

src: url('/backlight/custom/fonts/YourFont.eot'); /* IE9 Compat Modes */

src: url('/backlight/custom/fonts/YourFont.eot?#iefix') format('embedded-opentype'), /* IE6-IE8 */

url('/backlight/custom/fonts/YourFont-Regular.woff') format('woff'), /* Modern Browsers */

url('/backlight/custom/fonts/YourFont-Regular.ttf')  format('truetype'), /* Safari, Android, iOS */

url('/backlight/custom/fonts/YourFont-Regular.svg#svgFontName') format('svg'); /* Legacy iOS */

}
Of course, replace YourFont with the actual name of your font.
Now simply use your font as described above.


Hi Rod, I am trying to add the Microsoft “MV Boli” font to Backlight. I read your article above and modified/updated your CSS code to be up-to-date.
I am running in my subdirectory fz-test.franzzihlmannphoto.com. I put the MV Boli font into the following folder structure under my public_html folder: fz-test/backlight/custom/my_fonts. The name of the font file is: mvboli.ttf.
Here is the CSS code I am using:
@font-face {
font-family: ‘mvboli’;
src: url(‘/backlight/custom/my_fonts/mvboli.eot’); /* IE9 Compat Modes */
src: url(‘/backlight/custom/my_fonts/mvboli.eot?#iefix’) format(’embedded-opentype’), /* IE6-IE8 */
url(‘/backlight/custom/my_fonts/mvboli-Regular.woff2’) format(‘woff2’), /* Super Modern Browsers */
url(‘/backlight/custom/my_fonts/mvboli-Regular.woff’) format(‘woff’), /* Modern Browsers */
url(‘/backlight/custom/my_fonts/mvboli-Regular.ttf’) format(‘truetype’), /* Safari, Android, iOS */
url(‘/backlight/custom/my_fonts/mvboli-Regular.svg#svgFontName’) format(‘svg’); /* Legacy iOS */
}
Ater all this I can’t find the MV Boli in the Page designer (Font Family pull down).
What I am doing wrong – help…😅
you won’t see the font listed in the drop-down.
Either prepend the font family in Typography (and some other places) or use it in custom css.
See the “Using your font” section in the blog post above.
Thanks Rod….I did not absorb “Using your font”. It now works perfectly.
I very much appreciate your help.
Hi Rod,
I’m trying to use this guidance along with the new guidance from Matt on using Google fonts locally.
I’m not getting anywhere though. Matt does not mention PHP entries. Do we still need a PHP Head statement?
I tried disabling my site-wide Google API and reliying on the CSS matt provided and the PHP in your guidance but to no avail. The site defaults to the Other font family that works without a prepend.
I’m testing this on a Kookaburra test page with Kookaburra template although the rest of the site is Pangolin. Thanks
You only need to use phplugins to add an additional css file, like if you received one from a vendor you bought your fonts from. And only then if you didn’t want to clutter up your main custom css file.