This post is in response to this topic on the Backlight Forum.
European privacy laws now prohibit websites from contacting remote servers without the consent of your site’s visitor. Especially if the server originates from outside of the EU.
This affects how Font Awesome is used in Backlight sites. In Backlight, Font Awesome is served remotely using Matt’s Pro account.
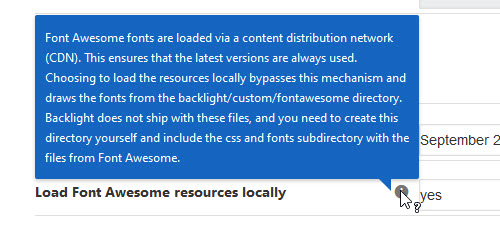 Because of the EU laws, Matt and Ben have added an option to load Font Awesome resources locally. Find this setting in Backlight Settings. Click the Advanced Settings link. You’ll find the setting under Miscellaneous. Hover over the Info icon for more information.
Once you enable this feature, a folder named “fontawesome” is created inside of your backlight/custom/ folder (this is from memory, you may need to create the folder using your FTP software). This is where you need to upload the Font Awesome assets.
You can download Font Awesome 5 (both Pro and Free) from the Font Awesome site.
If you’ve set this option to load locally and you’ve opted for the free version of Font Awesome 5, you’ll probably notice that many of the Font Awesome icons are now not showing up.
This is because Backlight’s css uses font-family: ‘Font Awesome 5 Pro’ and the free version requires the font-family to be ‘Font Awesome 5 Free.’
Unless you want to pay for a Pro account, you’ll need to create a custom css file to make the needed changes. Note that this will take care of the missing icons on your public facing site. You’ll still have missing icons in the Backlight admin areas.
Here’s how:
Visit your site.
Right click on the page and chose View Page Source (or words to that effect).
Scroll down the code to find the reference for the site css (the number at the end will probably be different):

Click on href link to be taken to the css file.
Select all and copy.
In a code editor (preferably) or plain text editor, paste the code and save as a .css file.
A good free editor for Windows is Notepad++, and for Mac, TextWrangler.
Use the Search or Find function in your editor and search on “Font Awesome 5 Pro”
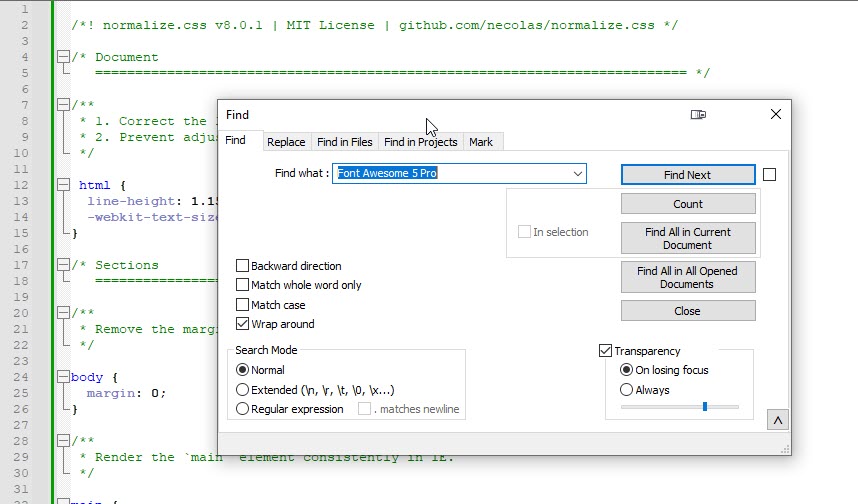
This will show, one at a time, all the instances of Font Awesome 5 Pro
For each instance, copy the entire rule and paste it into a new text file.
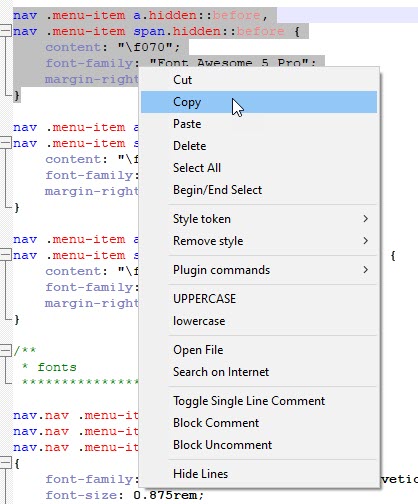
When copying, make sure that you include the closing curly brace. If things don’t work right when you’re done, it will likely be caused by the missing closing curly brace syntax error.
Go back to the original and click Next. Copy and paste the next rule. Repeat until you’ve copied them all into the new file. In some cases, you’ll see several rules that show Font Awesome 5 Pro. You can copy all these at once. Just start the next search beginning at the last one copied.
Keep an eye on where you’re at in the original file. If your text editor has line numbers, pay attention to those. In Notepad++ (at least), after you get to the last instance of the search term in the file, when you click “Find Next,” the search will start again at the top of the file.
When done, save the new file as a .css file. You can name it whatever you want as long as you don’t use spaces, or special characters. Dashes and underscores are fine.
Now perform a search and replace in your new custom css file. In the “Find what” field, type “Font Awesome 5 Pro” and in the “Replace with” field, type “Font Awesome 5 Free.” Click on the Replace All button.
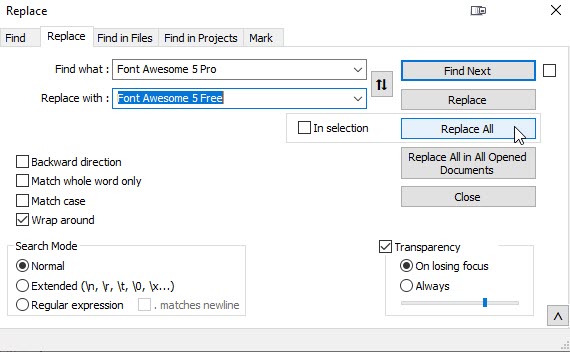
Save the file. And upload it to your site at /backlight/custom/css.
If you already have a custom css file, paste the contents of your new file into the existing custom css file and upload.
In Backlight, edit the page template and in the Advanced Setup tab under Custom Stylesheet, choose your new custom css file and save the template.
Go back to your site and refresh the page. The custom css should fix most things.
There will be some icons that aren’t showing due to some missing styling: they need to have a font-weight set. Most notable of these are the down arrows used in drop-down navigation. There may be more.
In your custom css file, do a search for “F107.”
That will bring you to the first rule using that icon. Add this to the rule:
font-weight: 600;

Click Find Next in the search to see if there are any more rules that use this font and add the font-weight property. There are probably very few.
Save the file and upload it again.
If you find any more Font Awesome Icons that aren’t appearing, you can use the browser’s Inspector to find the rule that needs to be modified, most likely with the font-weight property.
If you’re still stumped, report it to the forum (not the comments for this post) and one of us will probe your site and find the culprit. Be sure to include a link to a page that’s showing a problem.


thanks but what about galleries created in publisher /lightroom
It doesn’t matter. Adding the Font Awesome Free icons is independent of how you create your albums.
Hello can you tell me where to find this?
Once you enable this feature, a folder named “fontawesome” is created inside of your backlight/custom/ folder. This is where you need to upload the Font Awesome assets.
I am only using backlight to publish client response galleries in Publisher
When I tested this, I remember the “fontawesome” folder being created. If that’s not happening, just created it yourself.
If you have one already, you’ll find it in the backlight/custom/ folder on your server. Otherwise, create it via your FTP software