(Note: this post was written in the Backlight 1 days. Some selectors have changed in subsequent versions, but the concepts here still apply. And here’s an earlier post from the CE4 days on using the inspector)
Here’s another real-world example of using the browser’s inspector to help you find the css selectors needed to affect custom css changes.
Let’s say you want to make changes to the fonts in the tray (mobile) menu. That is, the navigation menu that appears when viewing your site on a mobile device.
The first thing to do is to open your site in a browser. I usually use Firefox. Once your site is open, narrow the browser until the web page changes to the mobile view. Then click on the menu icon to reveal the mobile menu.
Using the Inspector
Right-click on any of the menu items and choose “Inspect Element” or the equivalent for your browser.

The browser inspector will open and the element you selected for right-clicking should be highlighted on the left-hand side. Again, this is in Firefox.
(You should be able to configure the inspector to be docked on the side or bottom of the browser. You can also set it to open in a new window.)
On the right hand side, look for the css properties you want to control. In this case, we’re looking for something to do with fonts.
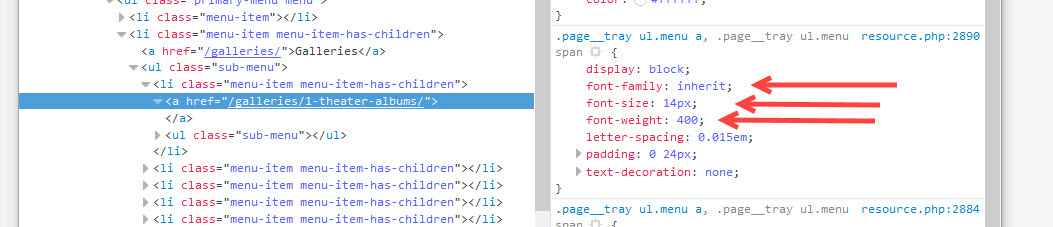
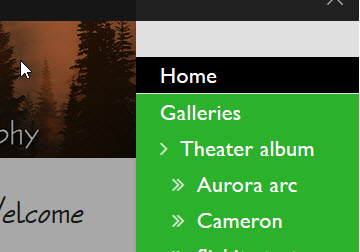
Make changes to the values to see if they affect what you expect them to. Select a value just as you would select text in a word processor and make a change. Here I’m changing the font-size value from 14px to 22px. You should see the change immediately on the web page. Note that this is not changing anything for others who may be viewing your site; you’re the only one seeing these changes.
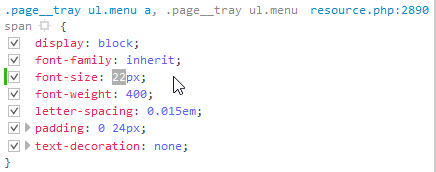
Go ahead and change the font-size property back to its original value.
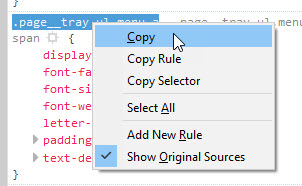
Now that you know that making this change does what you want, look above to the selectors. The selector that is controlling the element of interest is in blue. In this case it is .page__tray ul.menu a. Copy this selector.
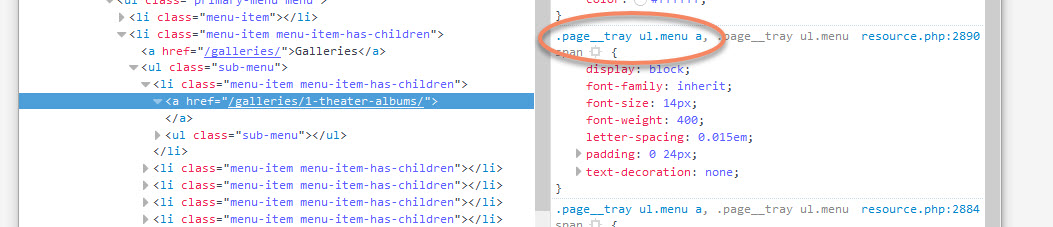
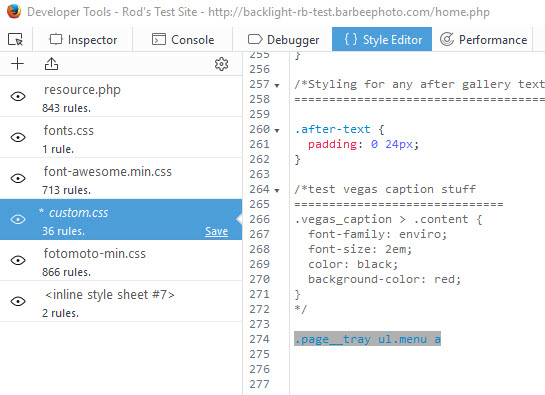
Look to the top of the Inspector window. Currently we’re in the Inspector tab. Click on the Style Editor tab.
You’ll see on the left-hand side all the css files being used. If you already have a custom css file, click on that. If not, just click on the resource.php file at the top. (For Backlight 2 and later, pick the file listed at the top. It will just have a single digit number)
Now scroll down to the bottom of the style sheet that’s shown and paste in the selector you just copied.
After the selector, add an opening curly brace. The closing curly brace should be added automatically. Hit Enter and start writing your css (between the opening and closing curly braces). Here I’m just changing the font-size.

Once again, you should see font size change in the mobile menu on the open page.
When you add the css in Style Editor tab in this way, you’re confirming that it will work in your real custom css file.
Once you know this, update your custom css file with the new rule and upload it. If you don’t already have a custom css file, now is the time to create one. See this.
Potential problems
What if it doesn’t work? Could be a few reasons for that. The most common reason is a syntax error. Be sure you include the semi-colon after each css declaration. Also make sure you’ve got that closing curly brace. And be sure to check your spelling. Additionally, many selectors in Backlight use double underscores instead of a single underscore. The example above uses a double underscore, so be aware of that if typing a selector rather than copy/pasting a selector.
Other syntax error related problems include using the wrong property or an improper value. You can find the proper ones by searching online. For instance, search “css fonts” for all sorts of information on how to write your css font related rules.
Specificity
The other most common reason that your css isn’t working is something called specificity; there is a more specific rule at work that is overriding the one you just wrote.
What this means is that there is another rule affecting your chosen element that uses selectors that are more specific for the element being affected.
For example, if you want to change the font for the anchor element in the mobile menu but you only use the “a” (anchor) selector, you probably won’t see any change to your mobile menu fonts. The more specific selector that we found (.page__tray ul.menu a) will take priority.
More on specificity here. This can sometimes get tricky and will take a little practice, but usually you can overwrite any css by using a more specific selector.
!Important
One exception is when the styling is included inline with the element in the page’s html. Inline styling has the highest priority. In this case, the way to override the inline styling is by using the !important property.
For example, if for some reason the selector we found above for the tray menu fonts wasn’t working by itself, we could add !important after the properties we wanted to change.
.page__tray ul.menu a {
 	font-size: 22px !important;
	font-family: lato !important;
}
In the example I’m using here, overriding with !important won’t be necessary. But sometimes it might be. But be careful, using !important can have unintended consequences in other parts of your site. Here’s more on using !important.
Learn CSS
If you really want to take control of your site’s styling, then learning some css is the way to go. I can highly recommend CSS: The Missing Manual by David Sawyer McFarland. The explanations are clear and there are a lot of examples and exercises, and the book is supported with sample files you can download.

